Chile Chocolate Sicilian style (no ice cream machine required)
Spice up your life, have some Chile pepper and feel alive! The slogans ring true for all of us who like a fiery touch every now and then. So, why not heighten the feeling of being alive and try some chiles in your ice cream too? Since the recipe even is made without any eggs, it should be perfect also for all (dairy-accepting) vegetarians! And this one does not even require an ice cream machine, but will still yield a great, smooth result!

Even if you hesitate to go all-out vegetarian, adding more veggies to your diet is clearly likely to increase general well-being and overall health. And add some nice burning sensations too, in case you turn to Chile peppers. And the Chile Chocolate ice cream recipe should be OK for most vegetarians who accept dairy products (Image by PETA/Ken Sax)
Chile pepper and chocolate is really a fantastic ice cream combination. The rich chocolate flavour (together with the coldness of the ice cream) usually also ensures that not only chile-lovers will be able to enjoy it. The tasting sensation can best be likened to “chocolate ice cream with a nice sting towards the end”.
“One taketh what one haveth” or Working without an ice cream machine
I have written about chile ice creams before, but this time around the circumstances forced me to come up with a working recipe with some limited means – no ice cream machine, no vanilla, no eggs, no thermometer … Luckily, all went very well, proving that good, smooth ice cream actually can be made even without an ice cream machine!
The base? You guessed it – the versatile Sicilian gelato – no eggs, just a little starch to guarantee a great consistency and fight pesky iciness!
Not only short of an ice cream machine, but also my usual range of staple ingredients, I hurried to the shop to grab the necessary. Typically, the shop was out of vanilla that particular night so in order to ensure at least some vanilla-flavour presence, I grabbed a small box of vanilla sugar (even containing some genuine black spots of vanilla). Cream, whole milk, some good dark chocolate (70 % cocoa), some good-quality fair-trade cocoa-powder and some raw sugar also ended up in my shopping basket.
For inverted sugar, I picked up a bottle of glucose syrup (which seems to be growing in popularity in Sweden these days when it comes to ice creams and inverted sugars). As usual, you could use any other type to your liking (Agave nectar, honey, corn syrup …). If you have no inverted sugar, you could simply use more ‘normal’ sugar instead (but not having any inverted sugar will likely make your final ice cream both sweeter-tasting and more firm-freezing, just so you know).
 But what about the chile pepper? Despite my earlier efforts, I had miserably failed to secure the specific, more original chile specimens I had planned to include (“sorry, they seem to be sold out”). What to do? I grabbed a small jar of non-specified, assorted “red hot” chile flakes. Later research showed that the particular blend I had laid my hands on scored about 15000 Scovilles (in other words, not overly hot if you are seriously into chile peppers, but probably at least medium-hot for most of us).
Preparing the base
Making a Sicilian gelato-base is relatively uncomplicated. Granted, since the base is heated on the stove it needs to cool down before being ready for the freezer. But then again, since still-freezing without ice cream machine will take a few hours anyway, the trade-off is not too bad considering the positive reward in the end.
First, dissolve the starch in some of the cold milk and set aside. This is important, since we want to avoid any lumps of starch in the ice cream base. And while I tend to favour corn starch (Maizena), any edible starch should normally do equally fine (arrowroot, potato flour …).
Next, break or cut the chocolate into smaller pieces – that way, they will melt easier later on. Set aside for now.
Now, in a saucepan, add the rest of the milk and the cream, together with all the other ingredients (= keep the milk/starch and the pieces of chocolate aside for now). And do not worry – the generous pinches of salt are not added to make the ice cream salty, but rather to enhance the other flavours.
On the dosage of chile pepper
Obviously, the amount you put into the ice cream should depend on your love and tolerance of chile peppers. And, obviosly, also on the strength and particular variety of chile pepper you would be using (dried peppers – like in this recipe – are stronger than fresh ones, for instance).
As the cold will dampen the intensity of flavours somewhat, avoid the temptation of adding too little. But of course, it is easier to add more chile to the base than take it away, so beginning to experiment with modest amounts might be a good starting strategy.
Most people who tried the present recipe were fine with the strength, and the testers included both chile-lovers and … well, less chile-loving persons.
Heating the base
Since I had no thermometer available, the following heat-indications will be more “rules of thumb” than measured in exact degrees (check here for a post with some more exact elaborations on temperatures). But do not worry too much – the Sicilian gelato base is quite sturdy and does not need the same kind of attention as typical custard bases. Just make sure that it does not boil, and that nothing burns:-)
On medium heat, bring the ingredients in the saucepan to steaming hot, while whisking regularly to avoid any burning. Then add the pieces of the chocolate, and make sure they all melt completely.
Now, add the milk-starch dilution. While whisking constantly, keep the ice cream base at about ‘steaming hot’, but not boiling.
With well-diluted starch and a high enough temperature, about 2-3 minutes of additional whisking might be all that is required to bring about the desired thickening of the ice cream base.
Take off from the heat and cool down as fast as possible (putting the base in a container and placing it in a sink filled with cold water is a useful trick). Once the base has cooled down, I would recommend to place it in the fridge to chill at least for a few hours. It might seem unnecessary to pre-chill something that is anyway destined for the freezer, but everything that decreases the final freezing-time is positive, and will improve the final consistency of the ice cream.
Still-freezing – the way to make ice creams without an ice cream machine
Once chilled, put the ice cream base in a freezer-safe container (relatively flat and wide ones are best, since they speed up the freezing). You may want to run your ice cream base through a sieve at this stage, and remove any visible pieces of chile pepper (or, if you don’t mind, you could just leave them in as fiery add-ins). Put the container in your freezer.
After 30-45 minutes, take out the ice cream base and churn it by hand. The first time, there is probably only some initial freezing along a side or so, but make sure to break up anything frozen and disperse evenly in the base: this will ensure that the ice cream freezes more evenly, and produce a better result. Return the base to the freezer.
Depending on your patience, wait between 20-30 minutes and take out the base again. Repeat the manual churning, which should be done generously – after all, it is not only a matter of crushing too large ice crystals into smaller ones but also a matter of whipping in some extra air into the ice cream base. Return the base to the freezer.
Wait another 20-30 minutes and repeat the process again, possibly even twice.
If you have a reliable freezer, you should now have a very nice, home-made ice cream with great consistency! If you like soft serve-ice cream, you could of course begin to enjoy the base as soon as it reaches that stage. Otherwise, just leave it in the freezer and enjoy later.
While the ice cream will have – as just noted – a very nice, smooth consistency, it may still freeze relatively hard. You could experiment with adding a higher proportion of inverted sugar as sweetener, or adding a couple of tablespoons of neutral alcohol, in order to gain a softer ice cream. Otherwise, just remember to place the ice cream in the fridge at the beginning of the meal, or take it out about 15-20 minutes before serving to soften up.
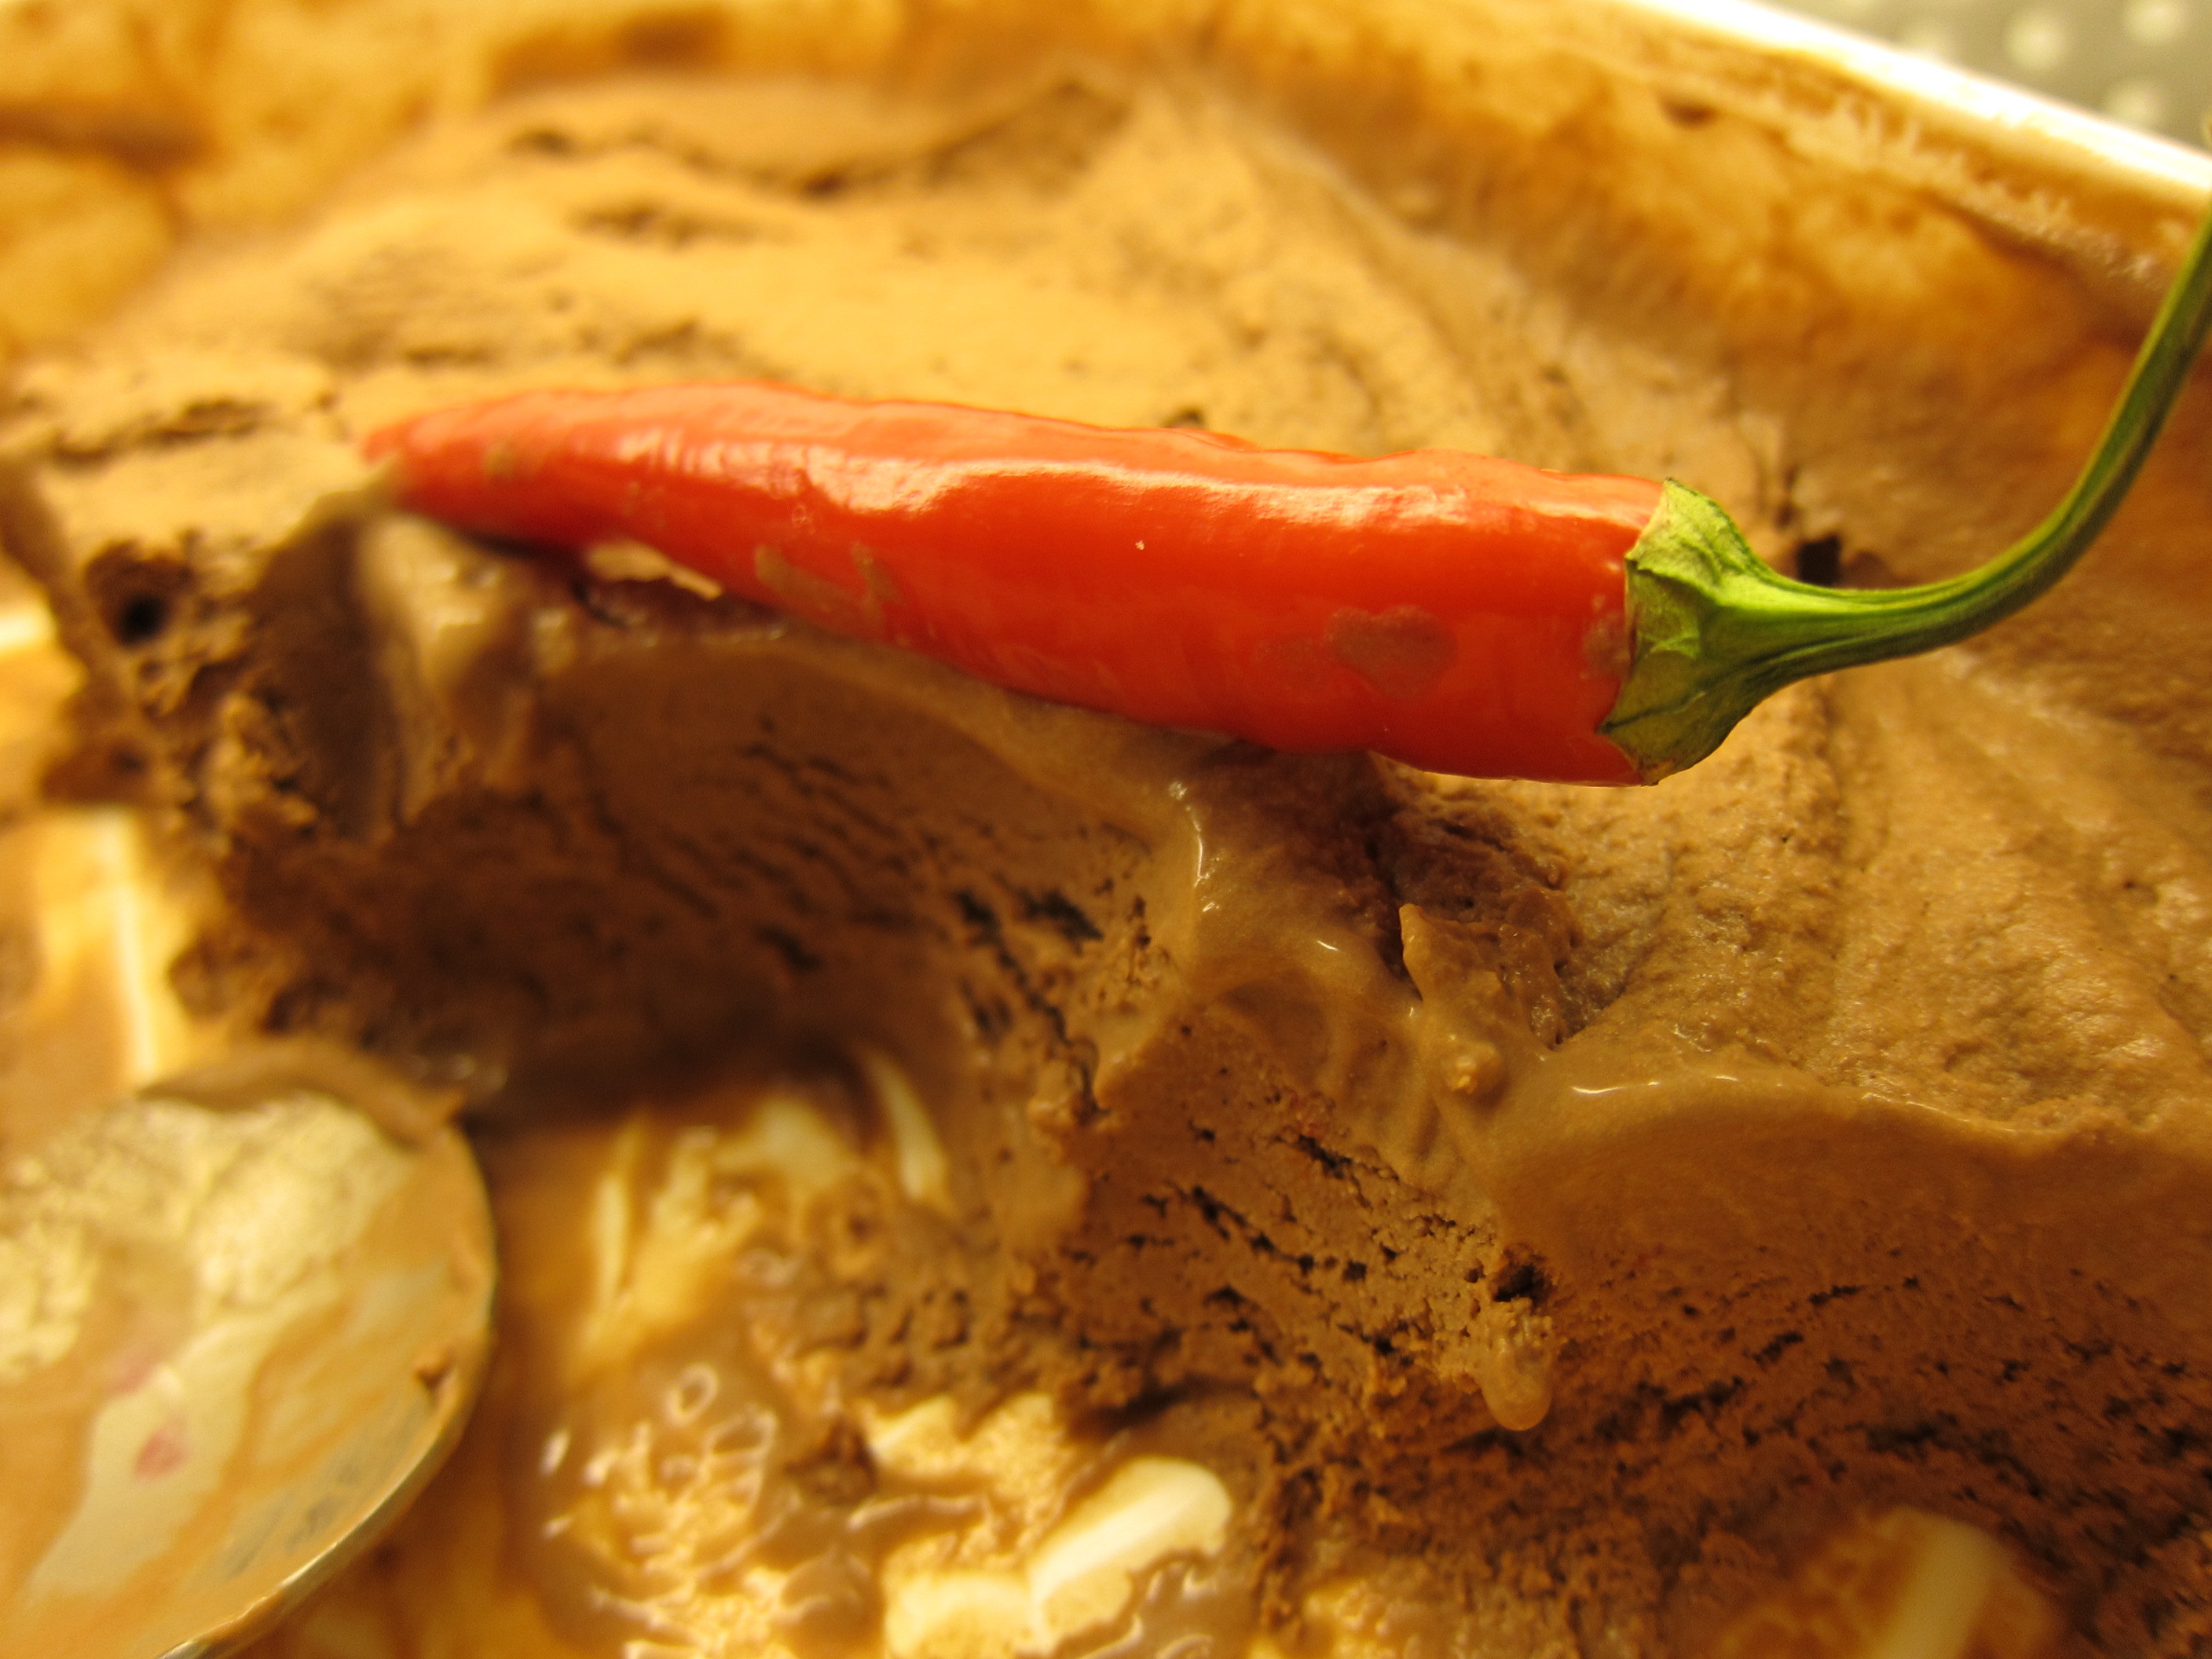
Chile Chocolate ice cream Sicilian style – great flavour and with great, smooth consistency even when prepared without an ice cream machine
Conclusion – Chocolate and chile are great in ice cream!
The Sicilian gelato-base once again proved its versability, creating a smooth ice cream with excellent consistency and texture – even without the use of any ice cream machine. And the flavour … the teasing sting of pepper combined with the rich chocolate turned out deliciously nice. You may probably have heard that eating chile peppers are supposed to be good for you in all kind of ways. But even leaving physical health aside, the sweet, burning sensation it creates in ice creams is just sooo incredibly good! Regardless of whether you already feel alive, or need to spice up your life – a smooth chocolate and chile pepper ice cream is the way!
- 300 ml (1.3 cups) cream
- 350 ml (1.5 cups) whole milk
- 20 ml (1 tablespoon) genuine vanilla sugar [or 1 teaspoon genuine vanilla powder, if you have]
- 80 ml (about 0,35 cup) raw sugar
- About 2-3 tablespoons of inverted sugar (= glucose syrup, honey, Agave nectar or whatever you prefer)
- About 2-3 tablespoons of starch (I used Maizena, i e corn starch)
- About 6-7 tablespoons of good quality cocoa powder
- 100 gram good quality dark chocolate (70 % cocoa or more)
- Between 1-3 teaspoons dried pieces of chile pepper (I used three, but obviously, this should depend on the type of pepper you are using and your personal heat-preferences)
- A good couple of pinches of salt
- Dissolve the corn starch wholly in 100 ml (0.4 cup) of cold milk. Set aside.
- Combine all the other ingredients except for the chocolate in a saucepan.
- Heat on medium heat until steaming hot, then add the chocolate (cut in pieces) and allow to melt.
- When the chocolate has melted, add the starch dissolved in milk. Continue to cook without letting the base boil for about 2-3 minutes: this should typically be sufficient for the starch to thicken the ice cream base sufficiently.
- Take off from the heat and allow to cool down as quickly as possible (like in a container put in a sink filled with cold water). Transfer to the fridge for further chilling at least for a few hours.
- When the ice cream base has chilled, put it in a freezer-safe container (you may want to put the base through a sieve and remove any pieces of chile pepper at this stage) and still-freeze in your freezer:
- Let the base remain in the freezer about 30-45 minutes, then take out the container and churn the ice cream by hand (I like to use a fork) or whatever tool you prefer until all has been evenly handled. In the beginning, you will notice that you mainly have to disperse what has begun to freeze along the sides of the container. Return the container to the freezer.
- Wait between 20-30 minutes or so and repeat the churning.
- Wait another 20-30 minutes and repeat it again. And possibly a third time.
- By now, you should have a quite smooth, evenly freezing ice cream in the making. If you like soft serve, you could start pondering whether to start enjoying your ice cream already now. Or wait some additional hours, after which you probably need to allow your ice cream some time outside the freezer to soften it (about 20 minutes in the fridge or so should do).


Hi, aim very curious about the type of chilli you are using as I have a client that would like the typical Sicilian chillis and I don’t know the name. Thank you in advance
Kind Regards
Dawn Meunier
Hi Dawn,
While the ice cream base is of the Sicilian gelato-type, I used a rather non-descriptive blend of red chillies with unclear origins.
As far as I know, there are quite a few types of chiles grown on Sicily, so “Sicilian chile” apparently more signals the place of origin than the specific type of chile used. For more extensive wisdom on chile peppers, from Sicily and elsewhere, I would like to recommend turning to my good friend Mats and his chile website! If he can’t answer your chile questions, I doubt anyone can 😉
Can you use an ice cream machine? If so, when would you add mixture to the machine?
Sure! Just prepare the base as in the recipe, let it chill down and then simply put it in your ice cream machine instead of the freezer.